


Why? Because Racecar of course.
The removal of "all" (we won't get into wiring and dash controls) AC Systems contributes to quite a bit of weight loss between the AC Pump, Fan, Condenser, etc. which is ideal for race-car-ness.
Before you begin: be advised that you will require a replacement accessory belt if you're removing the pump (details below).
You can leave the pump in and disconnect/remove everything else. Truthfully the pump is one of the most heavy items you can pull from this system (see Remarks at the bottom of the page) hence if you're going for weight reduction you will most definitely want to get rid of that.
Your fancy GSR controls will not know you removed AC i.e. the option to run AC will still be there. It won't blow up if you accidentally turn it on, but don't turn it on? The only way that I know how to get around this is to get RS controls without the AC option (this is quite difficult to install however and requires some re-wiring to make it work).
As always - use this as a guide and at your own risk.
IF you're removing the pump here is a NAPA part number for the accessory belt you are after:
25060569 (last checked Jan.30 - 2018; use your best judgment)

The number one thing you must do is depressurize and evaporate the AC system.
To do this properly and environmentally friendly we suggest you find a mechanic/shop that will do that for you.
If your AC isn't working then chances are yours has already evaporated and depressurized - if you're not sure seek professional assistance.
Once you have your accessory belt (or not if you're not removing the pump) and you're absolutely positive that the system is evaporated you can begin the work.
Diagram Markup:
1. Receiver
2. Condenser
3. Pump
4. Receiver to cabin tube
5. Receiver to condenser tube
6. Pump to condenser tube
7. Pump to cabin tube (2 piece but follows all the way through)
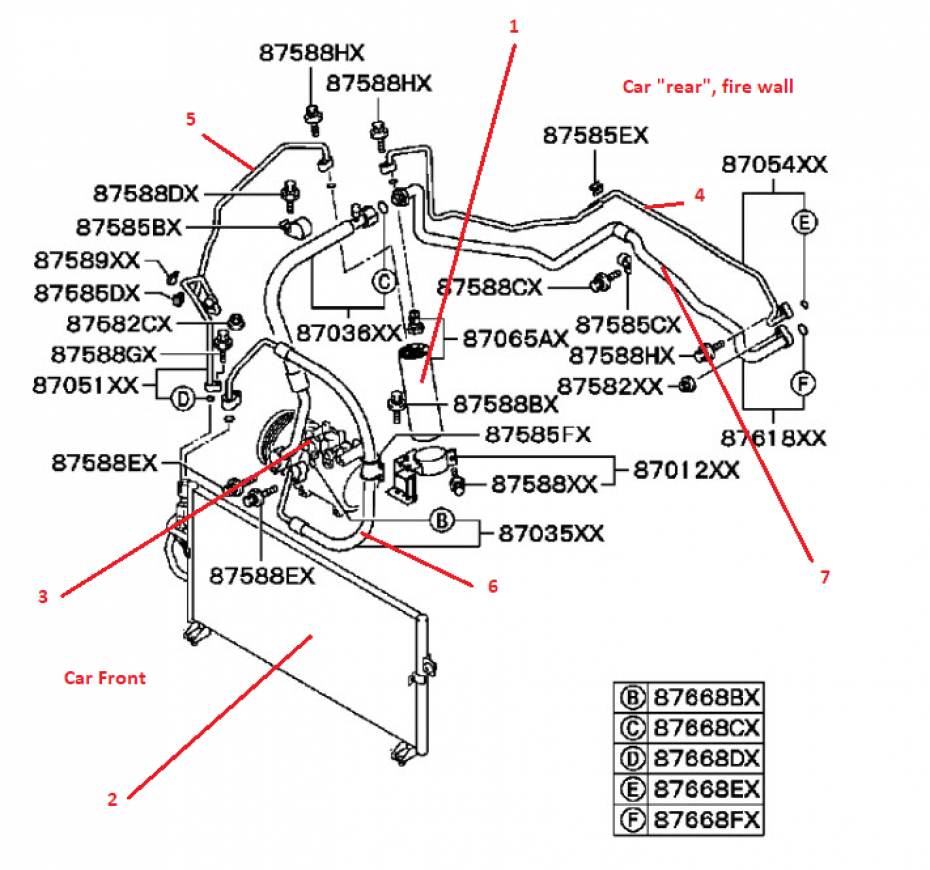
Use the diagram above and the blow engine bay markup as a guide for the rest of this article (diamonds below show approximate location of items that are hidden from actual view).

Part 1
Essentially this is the tubing and the receiver you want to remove from under your hood:

If you want to save your tubing you will spend more time trying to get this stuff out from the engine bay.
I did, and it took a long time... then I ended up throwing it out anyway.
Chop the tubes to save time.
1. Disconnect the receiver from the tubing and remove it.
2. Remove tubes 4 and 5
3. Remove tube 6
4. Remove tube 7
Move to Part 2.
NOTE: After removing tubes 4 and 7 you will notice there is a "hole" into the cabin now which runs into the ventilation system.
We did 3 cars this way and didn't plug the hole. It is entirely up to you what you do with it.
NOTE2: I ran my car for another year before I got to removing the pump, condenser, and fan. This will work.
The only reason why I didn't do everything all at once is because I ran out of time.
Part 2
Before you can do the rest of the system you will want to do a few things.
You will need the front of the car up in the air and you will have to remove the bumper.
If you have never removed the bumper before you should check out our article on that (there is a place where mostly everybody gets stuck on): CN9A Evo IV Front Bumper Removal.
Are you removing the pump? If yes:
1. You will need to remove the front right wheel.
2. Get the splash shield off from where the serpentine (accessory) belt is.
3. You maybe don't have to but it will sure create a lot more room to work - remove your windshield washer fluid reservoir.
4. Remove inner wheel well plastics to create more room.
5. Remove the accessory belt. To do this you need to release the tensioner. If you're careful (because it's aluminum) you should be able to use a 1/2" drive ratchet. Seriously be gentle and figure out how to apply the pressure to pull it to the side and down. Plenty of people have damaged these - don't be one of them.

6. Once your belt is out you can move onto removing the pump, pull out the bolts that hold it to a bracket (there should be I believe 4 long bolts you can access from the front of the pump).
7. The pump was mounted to a metal bracket, you can remove that metal bracket as well because more weight reduction bruh.

8. Install the new belt to manufacture specs (should be the same as RS model without the AC option). See the diagram below:

Next remove the fan.
1. You should be able to remove the fan without cutting anything but it's much quicker if you cut the tabs and get it out that way.
2. If you're not going to cut it (I didn't) you will want to remove the intercooler bolts that hold it to the frame and loosen your flex pipes on the intercooler to be able to move it around (or you can just take the intercooler completely out).
3. The problem with messing with the intercooler especially if you have never touched it on your 20year old + car is that you may damage something just cause it's old... so you're putting any brackets, bolts, or the flex pipes at risk of damage. Mine were fine...
4. If you're going to cut it out have fun doing that and it will be much quicker (as I said I didn't cut mine so you have to figure that out).

Finally remove the condenser. This one is a bit tricky, and if you have a pair of small hands good for you; otherwise you might want to borrow some small hands.
1. You will need to loosen the radiator to gain access to the condenser (you could take it out completely, same story, old parts, plus you're going to possibly want to drain your radiator fluid)
2. If you're not taking the rad off (I didn't) I would consider placing some towels behind it to protect it from hitting things (like your turbo/exhaust components etc) as you will have to pull it backwards. Once you pull it back you might want to place some towels at the front of it as well.
3. There are some tricky bolts you will need to get access to (small hands come in... handy... here); those mount the condenser to the frame. Get those out and pull the condenser out with your rad pulled back enough to allow you access.


That's pretty much it.
If you want to get fancy and remove wiring you would need to rip much of the harness apart.
Remarks
The heaviest items are the fan and the pump.
Next is the receiver, the condenser, and the bracket that holds the pump.
Followed by the tubing.
|
|
|
||||||||||||||||


|
|
 |
 |